
 Rendering is a vital process if you ever want to listen to your music outside of your DAW. It is also a higly useful tool - albeit one you should use carefully - for cutting down CPU usage in your DAW. This article sheds a little bit of light on both uses.
 In this article I use the term 'track' to mean an individual item, such as an instrument, loop, or sample, sitting on it's own row in your DAW.
Reasons to render number one: Listen to your tunes wherever you want
As you progress at music making, a good habit to get into is listening to your tunes outside of your DAW as well as inside it, so you can get a feel for how your tune might sound to other people. Should you wish some day to upload your tunes to a site such as Bandcamp or Soundcloud, or give CD's to friends or fellow musicians, the quicker you appreciate just how different your music sounds in different formats, in different systems, in different acoustic environments, the quicker you will be able to make your music sound better in all of them.
Make a copy of your tunes and listen to them on other media and players. Burn a CD - remember those? - and play your tunes on your hi fi, or the stereo you keep in the kitchen. Listen to your tunes when you're next cooking. Notice how different they sound to when you played them in the DAW. Put a copy of them on a USB drive, or store them on a site like Dropbox, then go to your mate's house and get your friend to play them on their speakers. They sounds different again, don't they? Just wait until you hear them playing on your mobile phone...
Anyway, I have digressed enough. Why they sound so different is a post for another day. Today, I'm talking about how to make those copies in the first place. You make these copies by rendering.
Rendering, if you haven't checked out my glossary yet, is the process of turning one or more tracks in your project into a sound file format which is playable both in and out of your DAW.

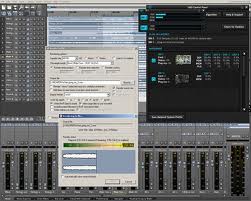
How to render using REAPER
As an example, I'm using REAPER as the DAW. In REAPER, as I'm sure it will be in any other DAW, it is very easy to render your tracks.
- Make sure the tracks you want to hear on your rendered file are not muted
- Click and drag to highlight the area you wish to render
- Visit File > Render in your menu toolbar
- The discussion about sample rate is something for another day. Keep to the default.
- Stereo should be the default option - make sure that it is.
- Select your format option - WAV, MP3, etc.
- Click 'Render' and away you go!
You now have one sound file, rather than the numerous tracks that you have in your previous project. This is where I turn to a second use of rendering.
Reasons to render number two: Let that computer breath....
A computer uses far less CPU when playing pre-recorded music than when playing VSTs and VSTis, so rendering is often used as a way of sparing CPU.
If a beat maker is happy with, say, the way they have played a piano section, but the piano vst is causing the DAW to freeze or threaten to fall over, the beat maker could render the piano section and replay it as, for example, a WAV or a WAV lossless file in place of the VST.
A word of warning! Once it is rendered, you cannot go back and edit as you can with MIDI
The downside of rendering a track is that you cannot then go back in and edit the track in the way that you could with MIDI.
There is at least one way around this, of course. Don't get rid of the MIDI file or original track completely. Instead, have two projects open, one which is the 'real' project, complete with VST tracks which can be manipulated and edited as you wish, with the second project simply being a collection of all the tracks that you are happy with as rendered files. I often have two versions of a project on the go at once using this technique. This can have its own disadvantages, but it usually works for me. Give it a go in your next project.
Credits
Image: www.forum.cockos.com
Comments